
Last updated on September 29th, 2023 at 11:34 am

Fresh herbs and vegetables are always a great addition to any meal, but when you add garlic to the mix, you really can’t go wrong. This delicious snow peas recipe is a perfect side dish for a light and fresh lunch or dinner.
I have long loved sugar snap peas and about two years ago made a recipe for some sugar snap peas with a bit of spice to them. But for some reason, I haven’t really ever gotten into snow peas.
That changes now.

The key to this garlic butter and basil snow peas recipe is having fresh ingredients. If you happen to have a garden and grow the ingredients yourself, then you are in for a truly fresh treat. But you can also find the ingredients at a farmer’s market or grocery store as well.
So, gather everything up and get ready for a simple and delicious side dish.
What Are Snow Peas?
Snow peas are small, crunchy vegetables. With a mild flavor and crunchy texture, what makes snow peas special? Well, it is their thin skin.
Not because they get offended easily, but because their skin doesn’t contain an inedible membrane like most peas. Snow peas have edible pods. So they can be eaten whole without shelling.

Snow pea pods are commonly available in spring and again in fall. However, this can vary widely depending on your local climate. They are a cooler-season crop but (despite their name) don’t actually grow in the snow.
Though the pods are typically eaten fresh, they are also often cooked in stir-fries. Which is kind of how we’re using them in this recipe.
Prep Your Ingredients

Before you begin cooking, it’s important to properly prepare your ingredients to ensure a successful and delicious dish. For this recipe, you’ll need to slice the garlic, chiffonade the basil, wash the snow peas, and remove any damaged pods.
To prep the ingredients for this snow peas recipe, we’ll start with the peas themselves. Wash the snow peas thoroughly. To wash the snow peas, place them in a colander and rinse them under cold water. Then, remove any damaged or discolored pods and discard them.


For a chiffonade, we want thin strips of basil leaves. Begin prepping the basil by washing it. Pat the leaves dry and then stack about 5 leaves together.
Then roll the stack of leaves up tightly. Using a sharp knife, slice the roll crosswise to make thin strips. Look at the example photos above for a simple demonstration.

For the garlic, I decided to go with thin slices for this basil snow peas recipe. I wanted the garlic to have enough of a presence to feel like a full ingredient rather than just a small flavor addition. First, peel off the skin and then slice off the ends of the garlic. Then, using a sharp knife, delicately slice the garlic into thin pieces that almost look like little garlic rounds.
Cook the Snow Peas
With the ingredients all prepped, it’s time to actually start cooking. Which begins with a pan and some butter.
Melt the butter over medium heat in a large frying pan and then add in the sliced garlic.

Stir everything around to coat the garlic in the butter.
Let the garlic saute for a few minutes until fragrant. Keep stirring them around occasionally to get a more even cook.
Now add in the washed snow peas. Stir them around to mix them with the garlic and coat them in the butter as well.
Even though we’re cooking the snow peas, we don’t want them to get too soft. They should still retain a nice bite and crunch when we eat them. So timing on the cook is key.
Saute the garlic and snow peas for

We still need a little pop of flavor for this snow peas recipe.
So add in the cut basil, salt, and pepper for the last few minutes of cooking in the pan. This will give it all just enough time to meld together the flavors without overcooking the fresh herbs.
You should end up with a buttery, garlicky savory side dish of just barely cooked snow peas and basil.
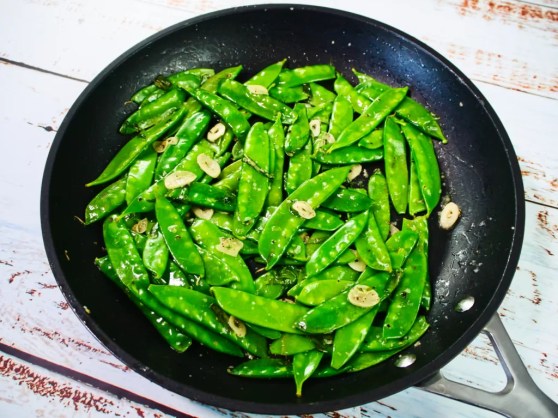
Plate and Garnish the Snow Peas
Everything’s cooked and ready to eat. But we now have to show it off well. Let’s plate and add some finishing touches. Look below for some ideas for plating and garnishing your garlic butter and basil snow peas.
For serving the snow peas, you could arrange them on a serving platter or individual plates. You can stack them neatly or scatter them in an artful way. Or just pour them straight from the frying pan into a serving bowl with a spoon or tongs.

Try adding some extra garnish to add some fresh flair to the dish. If you have any leftover basil or other herbs, chop them finely and sprinkle them over the snow peas. This will add some color and freshness to the dish.
Or mix it up and add a little citrus. For a tangy and bright flavor, you can grate some lemon or lime zest over the snow peas. This will also add some texture and contrast to the dish. Or just serve the snow peas with some lemon wedges on the side. Squeezing the lemon juice over the snow peas will add some zing and balance to the dish.
With these plating and garnishing tips, your garlic butter and basil snow peas will not only taste delicious but also look stunning on the plate. Enjoy!
What to Serve with This Snow Pea Recipe
Though this snow pea recipe is delicious, it isn’t a main dish. So we’ll need something else to pair with this.
The great thing is that this side complements a wide variety of meals. Feel free to try and match this side dish with whatever meal you plan on having for dinner.

But the following are some good options if you are looking for some meal ideas to go with this snow pea recipe:
- Orange Maple Soy Glazed Salmon
- Family Three-Cheese Lasagna
- Easy Ramen Omelet
- Steak with Gorgonzola Butter
No matter what you choose to serve with these snow peas, they are sure to add a touch of freshness and flavor to any meal. Enjoy!
How did yours turn out?
I’d love to hear when you try out garlic butter and basil snow peas! Take a pic of your food and share your success with me by adding it to your Instagram stories or feed, and tagging me @doyouroux, or by using #doyouroux.
Plus, leave a rating to let me know how you liked the recipe. It helps me out a lot to know how things worked out… or didn’t.
Garlic Butter and Basil Snow Peas
Course: Sides, AppetizersDifficulty: Easy6
servings5
minutes15
minutes20
minutesA simple, tasty recipe to make with fresh snow peas. This quick, easy, delicious side dish will make you feel like you’re eating spring in a dish.
Ingredients
3 cloves garlic
10 medium basil leaves
3 cups snow peas
2 tablespoons butter
1/2 teaspoon sea salt
1/4 teaspoon ground black pepper
Directions
- Wash the snow peas and basil leaves, remove any damaged pea pods, and then pat everything dry
- Chiffonade the basil by stacking the leaves on top of each other, rolling them tightly together, and then thinly slicing across the roll to create long, thin strips of basil
- Remove the skin from the garlic cloves, chop off the root end, and then finely slice the garlic
- Melt the butter in a frying pan over medium heat
- Add the sliced garlic to the pan and cook in the melted butter for about 2 minutes until fragrant, stirring occasionally
- Pour the snow peas into the pan and cook for 10-15 minutes, stirring occasionally, until they are tender-crisp
- Stir the basil, salt, and pepper into the snow peas and garlic, and stir while cooking for an additional 1-2 minutes until the basil is wilted
- Remove from the heat and serve
Get recipes like this straight to your inbox:


