
Last updated on April 1st, 2025 at 05:07 pm

I did not really know what the classic dinner rolls looked like for a while. Because we always had these rolls my mom would make that are kind of tied knots of dough. Almost like a combo dinner roll and garlic knot. Minus the garlic. But this is definitely the best dinner rolls recipe.
I reached out to my mom to ask about the rolls, how she came about the recipe, and all of its detailed history.

It all started with a recipe she found in a Better Homes and Gardens cookbook. That original recipe was for orange bowknots and you can find a version of it on the Better Homes and Gardens site. Mom appreciated that they were a sweeter roll, but she often left out the orange and most of the time left out the cardamom – which the recipe I linked to doesn’t even reference.
Comparing the version currently on their site, to my mom’s notes on how she changed and adapted the recipe over the years, to the final recipe that she passed on to me, it is clear that recipes change and adapt all of the time. For one, mom’s version is basically a double-batch of the original. Because we really liked these rolls growing up.
They always disappeared soon after being baked. The rolls were so pillowy-soft and delicious that I would grab one from the counter as I rolled through the kitchen and eat it plain as a snack.
Dinner Rolls Process
So, let’s get into the nitty gritty details on how to actually make these rolls. I have a few photo series showing the different stages and what to expect.

To make the dough, begin by combining all of the wet ingredients with all of the dry ones except flour (photo 1). Then mix in the flour until it comes together in the right consistency (photo 2). Once the dough is together, knead it, form it into a ball, and move it to a greased bowl (photo 3). Loosely cover it so that it can rise. The dough rises for a little over an hour until it has at least doubled (photo 4). Rise time will depend upon how warm your kitchen is.

When the dough has doubled, you are ready to move on to forming the rolls. Roll it out onto a lightly floured surface and then cut it into 1 inch thick strips that are 6 to 7 inches long.

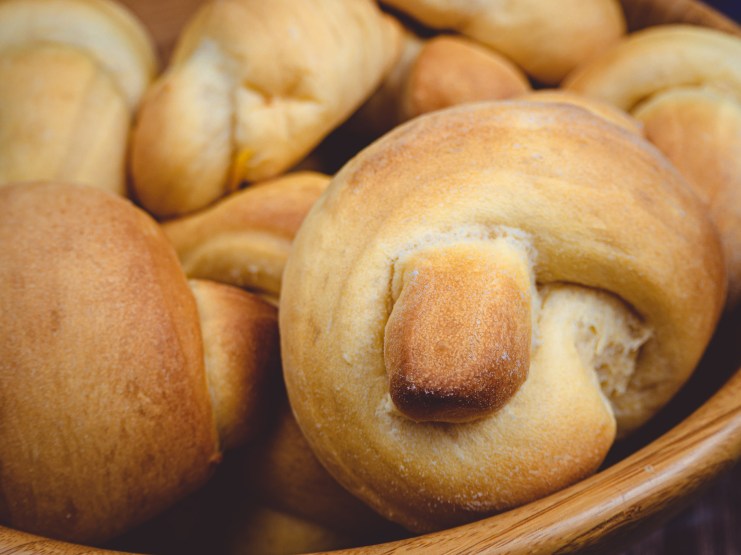
For tying the rolls, think about tying your shoes, just without a bow. Take a strip of dough and hold one edge in each hand about 1/2 inch from the edge (photo 1). Use your right hand to wrap the dough around the strip in your left hand (photos 2 & 3). Push the dough through the hole you’ve created by turning and wrapping (photo 4). Pull the dough the rest of the way through the hole (photo 5). Adjust both ends of the roll until you’re satisfied with its look (photo 6) before placing it on the pan for the second rise.

With the rolls all tied, place them on your baking sheet with a few inches between each one. I usually fit 6 rolls on a 9″ by 13″ sheet. Let them rest 15 to 20 minutes for the second rise. Then they’re ready to bake in the oven until that perfect golden-brown.
Pairs Well With…
These are amazing when eaten plain. But they also complement a lot of other dishes well. I especially love these rolls with soup. They easily soak up any soup, sauce, or dressing. Trust me, you’ll end up with clean plates after any meal you make along with this dinner rolls recipe.
- Ham and Dill Potato Cream Cheese Soup – My personal favorite recommended pairing
- Rodda Family Christmas Lasagna
- Thanksgiving sage-roasted turkey and simple turkey gravy

Mom’s Dinner Rolls
Course: SidesDifficulty: Moderate12
servings30
minutes15
minutes1
hour15
minutes2
hoursThe perfect golden-brown roll accompaniment to almost any dinner, makes about 24 rolls
Ingredients
1/2 ounce (2 of the 1/4 ounce packets) instant yeast
2/3 cup sugar
2 teaspoons salt
1/2 cup water
1 cup oil
2 cups evaporated milk
8 to 9 cups bread flour (all-purpose can substitute)
4 eggs
Directions
- Combine the yeast, sugar, and salt in a large mixing bowl
- Stir together the water, oil, and evaporated milk and then heat it in the microwave 30 seconds at a time until just warm (about 90 seconds)
- Mix the water, oil, and evaporated milk into the bowl with yeast, sugar, and salt
- Stir in two cups of the flour
- Add the eggs one at a time and mix thoroughly
- Mix in remaining flour, 2 cups at a time until it comes together in a slightly sticky dough
- Knead the dough by hand for 5 to 7 minutes and then form it into a ball
- Place the dough ball in a large greased bowl and let it rise until it has just over doubled, 1 to 1.5 hours
- Towards the end of the rise, preheat your oven to 350°F (175°C)
- Place the dough on a lightly floured surface
- Roll out the dough to 1/4 inch thick and then cut into 1 inch by 6 to 7 inch strips
- Tie the strips into knots and place them on a baking sheet
- Let the rolls rise 15 to 20 minutes
- Bake until golden-brown, about 12 to 15 minutes
Notes
- Rise time will depend on how warm your kitchen is


